DIY Project: Revitalize an Old Chair - Part 2 of 3
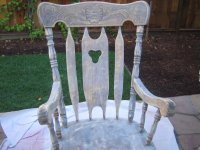
 At Home Depot, I invested in a orbital sander which was $30 (with my coupon). I figured having a little "help" would not be a bad idea and could save hours of manual labor. Here's a picture after I stripped its original skin. This took about 1 1/2 hours to complete. All the curved areas required manually sanding and some good old fashion s-w-e-a-t. A word of caution, whenever you use a sander, you should wear googles and a mask! I learned the hard way with a severely irritated eye and hacking cough that took a day to get rid of. (No worries...I'm feeling better now).
Here's another photo with my first coat of tinted primer. Alas, the light is at the end of the tunnel. Now for the final coat of paint.


6 comments:
wow, this is great. i cant believe that it was $25.
Very clever. Love the green. k
is the primer a spray or did you brush on?
I used a brush for both primer and paint. If you want precision and even coatings, they say you should always use a brush. When you go to the hardware store, you will see some lower cost options for brushes. You'll definitely see a difference when using a higher quality brush. Good investment! Hope this is helpful.
Just wanted to say i think it's totally cool! Love your blog, so couldn't help but posting something about it on my own blog...
I actually picked my own dinnerchairs off the sidewalk a year ago and totally redesigned them as well :-) Will keep track of your blog for inspiration i might need in the future. Thanks!
thanks eline! can you send me a link of your blog? i clicked on your name but end up on an error page. would love to see your dining chairs!
Post a Comment